This video by Shade Tree Films needs pretty much no introduction. Just watch and you'll see why it's so wonderful...what luck. P.S. That backdrop...swoon!

Wednesday, December 14, 2011
Tuesday, December 13, 2011
A re-dedication to my blog & Choco Labs
I stopped blogging in the spring, mostly because blogging was kind of a lot of work (I mean in my old format...make a recipe, take pics, upload, clean, blog). I've decided to take up this blog again mostly because of the wedding planning, but also because I just generally like writing, editing and collecting inspiration. This newly improved blog (like the new format?) will simply include whatever I dang well please. It's a chronicle of my current life, so hopefully (if the internet still exists), I can look back on it in years to come.
To start it off, here is a BEAUTIFUL video from Tiger in A Jar...my newly discovered obsession. This video is pretty much my dream life: a choco lab ranch (well that's not exactly what it is, but you'll see). Side note, JB reminded me that having a dog ranch would require some possible gland squeezing...I said I'd do it (I probably wouldn't).
What's your dream life?
Monday, December 12, 2011
A Cheery Break
When I first started my wedding obsession by reading blog post upon
post, I kept reading things about planning being overwhelming, stressful
and all-consuming. My first thought was "great" I LOVE weddings, so
I'll love mine even more. My second was "these people must not be
planners." Let me tell you, I'm a planner/organizer with a strong sense
of what I like and this wedding planning is OVERWHELMING!
So, for a break from the wedding madness, my roommate and I threw a holiday shindig of our own. Now, I love throwing parties; I love rearranging the furniture in to the most mingle-able setting, I love browsing through appetizer recipes, mixing drinks, choosing serving platters and making the house look so elegantly "lived in." However, because we're both only 21, our collection of serving dishes, holiday decor and generally money is pretty limited, so here is our holiday soiree *on a budget* in three easy steps.
Is anyone throwing a holiday themed, wedding-y party? Wine and crafts? Holiday engagement? Winter bridal shower? Tell me...I LOVE to hear!
1. Candles! Votives are CHEAP, check out these at Dollar Tree (4 for $1) and glass jars are cheaper (do you buy pasta sauce, salsa, jam). We've been collecting glass jars to use at my wedding and figured, why not use them twice?! With all the DIYs out there, it so easy to find something festive...these are my faves. Psst, the first link has TONS of ideas.

one, two
2. Easy appetizers. What's easier (cuter, tastier...) than tiny potatoes wrapped in bacon? Add in a dipping dish of Dijon and you're ready to go. Also, brie was one of our splurgerier treats...but the stuff on top is just sugar and water!! P.S. Of our limited serving dishes, we do have a wood cutting board...perfect for cheese and crackers!

one, two
3. Simple, festive drinks (that you can make in BIG batches). We decided to offer two drinks, cider and nog (both of which were a HIT). The best part about these is that they are easy as heck, but still way classier than the usual 21-year-old party drink.
What do you do to break from the all-consuming wedding planning?
Don't worry, I'll be done with this hiatus next week, because this weekend I have my first WEDDING DRESS FITTING with my mom and all of my bridesmaids! I can't wait! Does anyone have any fitting tips?
P.S. I wish I could have a snowy, winter wedding...there'd be muffs and cider for all!
So, for a break from the wedding madness, my roommate and I threw a holiday shindig of our own. Now, I love throwing parties; I love rearranging the furniture in to the most mingle-able setting, I love browsing through appetizer recipes, mixing drinks, choosing serving platters and making the house look so elegantly "lived in." However, because we're both only 21, our collection of serving dishes, holiday decor and generally money is pretty limited, so here is our holiday soiree *on a budget* in three easy steps.
Is anyone throwing a holiday themed, wedding-y party? Wine and crafts? Holiday engagement? Winter bridal shower? Tell me...I LOVE to hear!
1. Candles! Votives are CHEAP, check out these at Dollar Tree (4 for $1) and glass jars are cheaper (do you buy pasta sauce, salsa, jam). We've been collecting glass jars to use at my wedding and figured, why not use them twice?! With all the DIYs out there, it so easy to find something festive...these are my faves. Psst, the first link has TONS of ideas.

one, two
2. Easy appetizers. What's easier (cuter, tastier...) than tiny potatoes wrapped in bacon? Add in a dipping dish of Dijon and you're ready to go. Also, brie was one of our splurgerier treats...but the stuff on top is just sugar and water!! P.S. Of our limited serving dishes, we do have a wood cutting board...perfect for cheese and crackers!

one, two
3. Simple, festive drinks (that you can make in BIG batches). We decided to offer two drinks, cider and nog (both of which were a HIT). The best part about these is that they are easy as heck, but still way classier than the usual 21-year-old party drink.

Don't worry, I'll be done with this hiatus next week, because this weekend I have my first WEDDING DRESS FITTING with my mom and all of my bridesmaids! I can't wait! Does anyone have any fitting tips?
P.S. I wish I could have a snowy, winter wedding...there'd be muffs and cider for all!
Monday, December 5, 2011
Wedding veils, hats and flower crowns
My extensive list of wants and ideas for this wedding is getting a
little out of hand. My mom is continually trying to help me focus, which
I've done on a few parts of the wedding, but on others, it seems like
the inspiration and possible choices are never ending! That brings me to
my wedding headgear (not the braces kind).

I've been searching for the perfect reception headpiece for a while now to no avail. It's not because I don't like anything, it's because I LOVE everything. I can't get enough of chiffon flowers, tulle bows, vintage pillbox hats and especially not enough of live flower crowns. Now you can see my true frustration and utter confusion because of the plethora of over-the-top duds to perch on top of my head. I keep telling my roommate that I want something ridiculous because when am I ever going to get the chance to wear a flower the size of my head in my hair ever again? But then I find precious little bobby pins and my vision shifts again.
Here are a few of my favorites (a FEW). Do you have this problem? What are you wearing in your hair? Veil, hat, fascinator, nothing? HELP ME DECIDE!
Also, almost all of these are from Etsy...I am an Etsy fiend!


Clockwise from top left: One, two, three, four, five, six, seven, eight, nine ten, eleven, twelve, thirteen
P.S. I've already bought my headpiece for the ceremony, but you'll have to wait and see it at the wedding (my attire is the one thing I'm trying to keep secret from JB and let me tell you, keeping it a secret [even if JB doesn't really care] is HARD for me).
Monday, November 28, 2011
Lights and Love: Nighttime Inspiration
Before I get in to all the details that everyone always asks about
like the venue, the dress, colors…and my obnoxiously overzealous list of
potential DIY projects, I want you to get a feel for the atmosphere I’m
aiming for (I’ve been told I’m a big picture person…so here goes all of
my big picture thoughts).
For me, flowers aren't incredibly important (especially because my wedding will be at night...who can see flowers at night anyways?). So my focus for the wedding is on creating a dreamy atmosphere with candles...lots and LOTS of candles.
P.S. My ultimate wedding dream would be to release TONS of floating candle lanterns...thanks Texas for your constant state of extreme drought. I guess I'll have to settle for floating candles in the pool.
Do you have and neat nighttime inspiration?


Clockwise from top left: one, two, three, four, five, six, seven, eight, nine, ten
P.S. The floating luminaries above (number eight), I bought a few of them and somewhere near 100 paper lanterns...these are the best deal, a TON of votives and instead of pillar candles (which are CRAZY expensive), I bought these.
Follow me on Twitter :: Get inspired on Pinterest
Monday, November 21, 2011
Engagement Photos...*swoon*
Have you had a chance to meet our Monday bride? Her name is Taylor and she is planning a backyard wedding in Texas. Read more about her!
I finally had my engagement pictures taken this past Sunday (we'd been waiting for the Texas weather to cool down because there's nothing I love more than a good "wrapped-in-a-quilt-snuggling" picture) and let me tell you, taking engagement photos is FUN. I love getting my picture taken regardless, but with a professional photographer and cuddling my lovey...there's nothing better!

We took our pictures in Prosper, Texas, (I told Braeden [our photog] I wanted a field and he delivered with some field-filled terrain) on an unseasonably warm November afternoon and I am thrilled (I made JB slowly scroll through the sneak peek photos for at least an hour) with the results.

These pictures were taken by Braeden Rogers at Ambient 11 Photography and I have got to say that he was absolutely stellar. From the moment we arrived to the second we left, the three of us were laughing and having a great time. As if just generally having fun isn't enough, his photo-journalistic images are to-die-for! They are so raw in the happiest, most joyful sense! I can't wait for Braeden to take the rest of our pictures in June!!

Quick advice! We had trouble deciding between a one-hour and a two-hour engagement session and after a friend's advice (thanks Mal!), we decided to go with two-hours. In my opinion, the two-hour session was the best decision we have made this far in the process. Two-hours allows you and your fiance to get comfortable being photographed, it allows the photographer to get to know you two as a couple and (especially if you're shooting outdoors) it gives you more time to find that perfect amount of sunlight that makes your photos oh-so dreamy!
So, if your budget can handle it, pick two hours, you won't regret it!
Without further adieu...


All photos by Braeden Rogers at Ambient 11 Photography
I finally had my engagement pictures taken this past Sunday (we'd been waiting for the Texas weather to cool down because there's nothing I love more than a good "wrapped-in-a-quilt-snuggling" picture) and let me tell you, taking engagement photos is FUN. I love getting my picture taken regardless, but with a professional photographer and cuddling my lovey...there's nothing better!
We took our pictures in Prosper, Texas, (I told Braeden [our photog] I wanted a field and he delivered with some field-filled terrain) on an unseasonably warm November afternoon and I am thrilled (I made JB slowly scroll through the sneak peek photos for at least an hour) with the results.
These pictures were taken by Braeden Rogers at Ambient 11 Photography and I have got to say that he was absolutely stellar. From the moment we arrived to the second we left, the three of us were laughing and having a great time. As if just generally having fun isn't enough, his photo-journalistic images are to-die-for! They are so raw in the happiest, most joyful sense! I can't wait for Braeden to take the rest of our pictures in June!!
Quick advice! We had trouble deciding between a one-hour and a two-hour engagement session and after a friend's advice (thanks Mal!), we decided to go with two-hours. In my opinion, the two-hour session was the best decision we have made this far in the process. Two-hours allows you and your fiance to get comfortable being photographed, it allows the photographer to get to know you two as a couple and (especially if you're shooting outdoors) it gives you more time to find that perfect amount of sunlight that makes your photos oh-so dreamy!
So, if your budget can handle it, pick two hours, you won't regret it!
Without further adieu...


All photos by Braeden Rogers at Ambient 11 Photography
Wednesday, March 30, 2011
Bean Enchiladas (Veg Friendly)

The dish that I can absolutely eat until I'm sick: enchiladas. I've loved them since I was little and last night, as a birthday week present for myself, I cooked bean enchiladas for dinner.
An easy crowd pleaser, my mom and I have often made hundreds of enchiladas for events, and it never takes longer than an hour or so.
So, here is my easy, fool-proof recipe for enchiladas:
Makes 10
Bean Enchiladas (or meat if you want)
Ingredients:
- 1 can of refried bean
- shredded colby jack cheese
- 10 flour tortillas
- 1 can tomato sauce
- 1 packet McCormick enchilada spices
- OPTIONAL: ground beef or ground turkey (cooked)
Directions:
- Simmer tomato sauce mixed with spice packet until warm.
- Fill each tortilla with a large spoon full of beans, a sprinkle of cheese and a spoonful of sauce (add the meat and anything else you might want here too); spread evenly down the center of the tortilla.
- Roll tortillas and place them side-by-side in the pan (the closer the better)
- Top generously with cheese and sauce.
- Cook at 350 F for 25 minutes, or until enchiladas are hot in the center.
- Serve immediately.
- Enjoy!
These enchiladas are great re-heated! You can also freeze them for about a month and take them out one at a time for lunches or dinners.
Saturday, March 26, 2011
Comida
I haven't been very good about writing lately because I've been working on Comida, my senior honors project. Comida is a mix of academic, journalistic, and sometimes humorous reflections on Spanish culture through food. It is also an album of memories, a souvenir from my life in Spain. Enjoy!
Tuesday, February 22, 2011
Fort Worth, Get Ready...
 I have now been twice and let me tell you, it is already on its way to becoming one of my VERY favorite restaurants. The Tavern, off Hulen Street in Fort Worth is unassuming. Sitting on the corner of South Hulen and Stonegate Blvd. (formerly Snookies) with a bright neon sign, you would never guess that Chef Felipe Armenta is serving gourmet, budget-friendly dishes inside. The atmosphere is warm and dark with unique kitchen themed artwork and Pottery Barnesque industrial light fixtures. Waiters are friendly to say the least as you can tell that they all love the restaurant just as much as Chef Armenta himself. However, none of this compares to the amazing food coming out of the kitchen.
Like I said, I've visited twice and tried two different meals, both of which were worth talking about days later. Armenta's queso, although very untraditional, is to die for. The queso, which is basically an upscale pimento cheese with fire roasted peppers is served as one member of a trio accompanied by guacamole and salsa. As my boyfriend and I order a refill of chips to make sure that we could scrape every last ounce of the three dips off the plate, we realized that each dip individually was more than good enough to order on its own. Although the queso is the most unique of the three, we honestly couldn't pick a favorite (which is a big deal because we like to think of ourselves as chips and dip connoisseurs) they were all three that good!
My first time at The Tavern, I went for the Mexico City Enchiladas, an enchilada fiend, I enjoyed the larger cut chicken smothered in cheese and a sweet but spicy red sauce as opposed to the overdone pulled chicken and sour cream. However, my favorite dish so far was the Zuni Chicken Salad. I need to preface this with the fact that I am not a salad orderer, if I had a choice between salad and enchiladas, I wouldn't even have to make a decision, however that night, my quick lapse in decision making was rewarded ten-fold. Thinking that I was ordering a chicken salad, in the chicken salad sandwich sense, I was surprised if not a little disappointed when my waiter delivered a large salad with sliced chicken scattered throughout. This disappointment quickly turned in to the best salad I have EVER eaten. Fresh lettuce lightly coated in some sort of magical sauce is tossed with dried cherries (they might as well have been gold), golden raisins, walnuts, bacon (yes bacon), some of the best grilled chicken I've ever eaten and GOAT CHEESE. As you can remember from my earlier post, goat cheese is a necessary staple in my diet, and this salad definitely subdued my craving (at least for the night).
I know my adoration for this salad might seem over exaggerated, but I can promise you it is not. Even my boyfriend, with a steak and enchilada plate sitting in front of him, agreed that this was a dang good salad.
To finish our meal we had key lime pie (that's right, they have pie...my favorite dessert) on recommendation from our waiter and it also was to die for. But I do have to say that my first time in, I had banana pie and it was the best banana pie I have ever had (there's a little surprise inside...you'll have to visit to find out).
Bellies stuffed, we left happy from our second trip to The Tavern and I can guarantee that we will be back soon.
My recommended meal:
Queso "Americano"
Zuni Chicken Salad
Banana Pie
Related Articles

Friday, February 18, 2011
Tortilla de Patatas
 My favorite meal while I was living in Spain was the Tortilla de Patatas or Tortilla Española, a quintesential Spanish staple. I had this tortilla all over Spain and I can guarantee that the tortilla my Señora made was by far the very best. So, during the four months I lived with her, I was able to learn some of her secrets to the perfect tortilla and I am ready to share them with you!
Tortilla Española (read about my adventures with la tortilla here, in an pre-release excerpt from my Spanish food magazine: Comida)
Ingredients:
Potatoes, any variety
1 onion
3-6 egg whites
2-4 egg yolks
Salt to taste
Extra Virgin olive oil
1 onion
3-6 egg whites
2-4 egg yolks
Salt to taste
Extra Virgin olive oil
Directions:
1. Pour 1-1.5 inches of olive oil in the bottom of a round-bottomed pan.
2. Peel and slice potatoes in to approximately 1 cm thick rounds. Place potato slices in warm oil until pan is about 2/3 full of potatoes. Oil should not be boiling.
3. Continue to turn potatoes for about 10-15 minutes or until all slice are soft. Potatoes should not brown.
4. Add salt to taste.
5. Grate onion in to potato mixture and continue to turn for about two more minutes.
6. Strain potato mixture, removing all excess oil (the easiest way is to allow the mixture to sit in a strainer for about three minutes).
7. While mixture is straining, beat all eggs together.
8. Pour potato mixture back in to pan and pour eggs over the top. Turn mixture so that the eggs are evenly dispersed.
9. Add salt to taste.
10. Allow Tortilla to cook for approximately three minutes, or until tortilla hold together when pan is shook.
11. Using a plate, flip the tortilla on to the plate and slide it back in to the pan allowing the other side to cook.
12. Cook for about three more minutes and carefully slide on to serving plate.
13. Allow the tortilla to sit for at least 30 minutes before serving so that it holds its domed shape.
14. ¡Buen Provecho!
To learn more about my time in Spain, visit: taylorqchat.blogspot.com

Thursday, February 17, 2011
Easy Chicken Picatta
 I strayed from my usual baked ziti at Bellisimo in Colleyville and tried the chicken picatta on a recent trip. Although Belisimo's baked ziti is the best baked ziti I've ever had, their chicken picatta held its own. Since chicken picatta is a little lighter than baked ziti, and the weather has been warming up, I decided to give it a try. Here is my super simple version of chicken picatta and I promise you won't regret it!
Ingredients:
2 chicken boneless, skinless chicken breasts, butterflied and cut in half
1/4 cup chicken stock
6 Tbs. olive oil
4 Tbs. butter
juice of 1 large lemon or 2 small lemons
angel hair pasta (as much as you'd like...I used a little less than half a package for 2 people) flour
garlic powder
paprika
salt and freshly ground pepper
OPTIONAL:
capers
fresh lemon slices
Directions:
1. Boil pasta with a sprinkle of salt and splash of olive oil until desired texture (about 8 minutes).
2. Heat 2 Tbs. oil and 1 Tbs. butter in large pan.
3. Season chicken breasts with salt, pepper, paprika and garlic powder.
4. Cover chicken breasts in a light coating of flour.
5. Place 2 chicken pieces in pan once the oil begins to simmer and cook for 3 minutes, flip and cook for three more minutes, or until golden brown and no longer pink inside.
6. Take chicken off heat and place on plate (they're not finished yet, this is just a holding area).
7. Put 2 Tbs. of oil and 1 Tbs. of butter in pan with remaining oil and butter, cook the other 2 pieces of chicken the same way as the first two.
8. Remove chicken from pan add the final 2 Tbs. of olive oil, 2 Tbs. of butter, chicken stock and lemon juice (remove from heat to add these ingredients to avoid splattering and grease burns).
9. Bring sauce mixture to boil, then reduce to simmer.
10. Add all 4 chicken pieces back in to the pan with the sauce and let simmer for a minute or 2, coating each chicken piece in sauce.
11. Plate the angel hair pasta first, topped with chicken and remaining sauce.
12. Top with fresh lemon slices and capers if you have them.
13. You're gonna love it!

Monday, February 14, 2011
Fried Goat Cheese Salad
 While I was in Spain I developed an undeniable adoration for goat cheese (like eat a pound of goat cheese in one sitting, even when I'm full, kind of love). So, upon returning home to Texas it has been my goal, or rather a necessity, to incorporate goat cheese in to my life. While watching one of the new shows on OWN (I will always follow Oprah), I saw a chef cooking fried goat cheese and it looked easy. So, I decided that Valentine's Dinner was the perfect time to attempt this fancy-ish technique. My little goat cheese bubbles where hard to flip and cooked much faster than I expected, but they were absolutely wonderful!
Fried Goat Cheese Salad (serves 2)
Fried Goat Cheese
1 6 oz. package of goat cheese (or 3/4 of a 8 oz. package)
1 egg
panko bread crumbs (I used italian flavored)
flour
olive oil
Salad
Baby Spinach
Honey Balsamic Dressing
1 Tbs. balsamic vinegar
1 tsp. olive oil
1-2 tsp. honey (depending on how sweet you like)
Directions:
1. Roll goat cheese in to small 1/4 balls.
2. Make three bowls, one with flour, one with an egg (well stirred) and one with bread crumbs. With your thumb, lightly press each ball in to a disk.
3. Coat each goat cheese ball in flour, dip it in egg and coat it in bread crumbs. Repeat the final two steps, dipping the ball in egg and then bread crumbs once again.
4. Heat 1/8 inch of olive oil in pan.
5. Place each disk in oil, cook for 30 seconds to a minute, flip the disk and cook the other side 30 seconds to a minute.
6. Mix all dressing ingredients.
7. Serve warm goat cheese disks on a bed of baby spinach, topped with the honey balsamic dressing.
8. Enjoy!
Black Bean Soup
 One of my all-time favorites, I remember my mom ordering black bean soup at the now long-gone Espinosas (a Chatfield favorite). As I've grown to unabashedly adore beans of all kinds, black bean soup has been on my to-cook list for a while so the other night, I finally tried and based on boyfriend reviews (which might be slightly biased) succeeded. Here is my ramshackle black bean soup that I threw together out of my college-student pantry and turned out to be extremely quick and tasty.
Black Bean Soup
Recipe:
1 can black beans, juice poured off, but not strained
2.5 cans water (fill the black bean can)
1 large handful of brown rice
.5 medium onion, coarsely chopped
6 pieces cooked bacon (I used turkey bacon because I like it better)
1 large tomato diced
1-1.5 Tbs. chili powder (to taste)
1.5 Tbs. garlic powder (or 1 garlic clove if you have one)
handful of chopped, fresh cilantro
1 tablespoon of your favorite salsa (I use my homemade salsa)
salt and fresh ground pepper to taste
OPTIONAL:
crumbled feta cheese for topping
sour cream for topping
Directions:
1. Sauté garlic (if you have it) and onions until onions are transparent.
2. Pour excess liquid off beans, put beans, rice, water, tomatoes, onions, cilantro, salsa and cooked bacon in large pot.
3. Bring mixture to boil and then reduce heat to simmer
4. Season mixture with garlic powder (if garlic cloves weren't used), chili powder, salt and pepper to taste.
5. Allow mixture to simmer until it has reduced to your desired consistency and the rice is cooked through(mine took about 10 minutes). Extra water can be added and reduced if the soup becomes to thick.
6. Serve hot with crumbled feta cheese, sour cream or both.
7. Eat up!
P.S. Sorry if this picture isn't the most appealing, we ate it so fast that the soup was almost completely gone before I remembered to take a picture.
Saturday, February 12, 2011
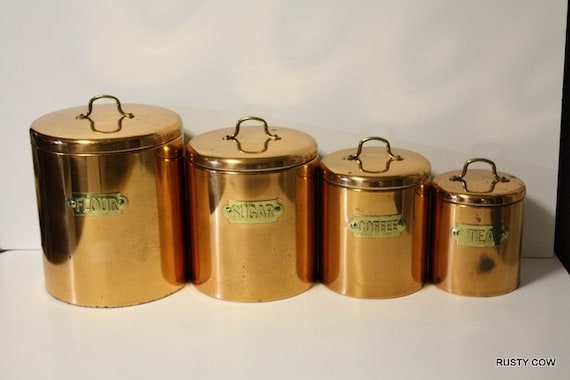
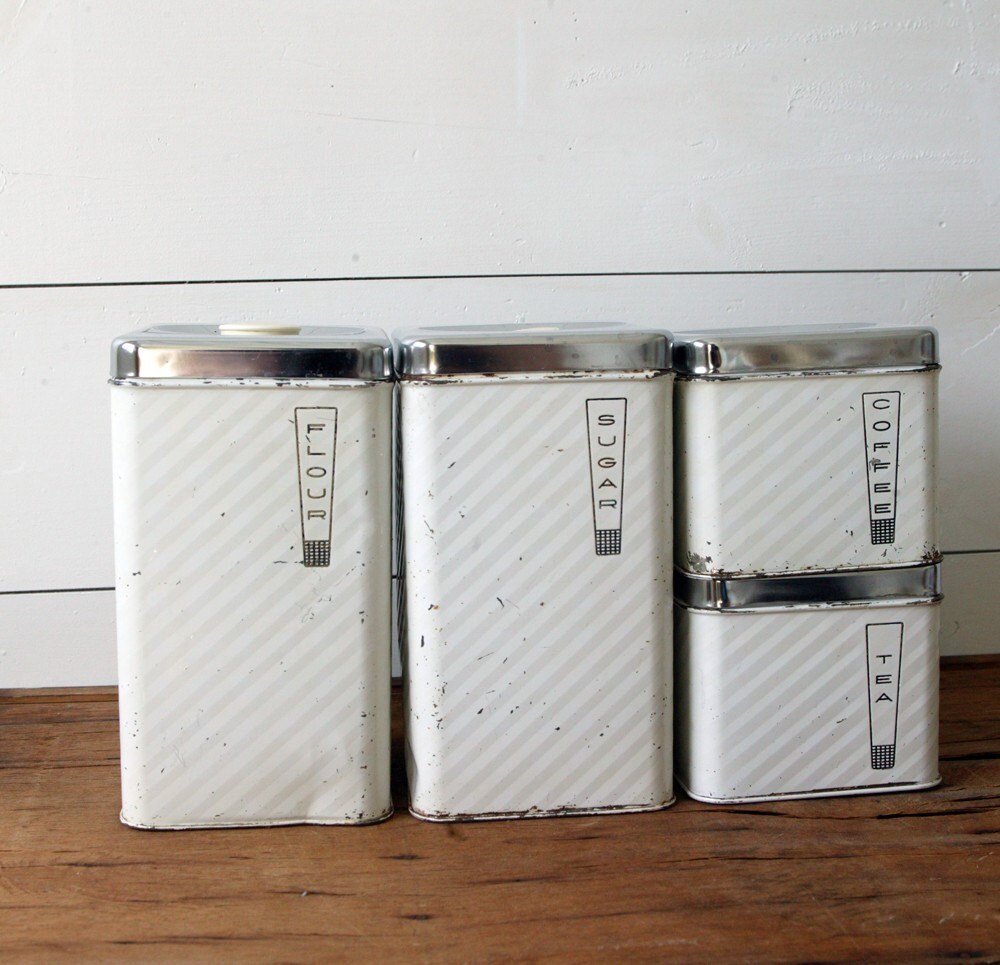
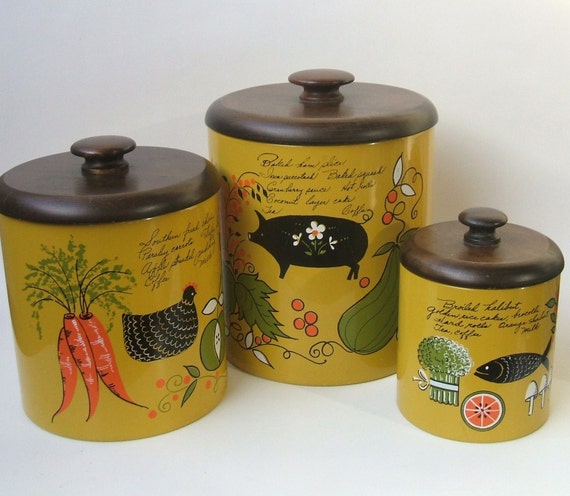
Want, want!
I've been searching everywhere for a canister set. I've always loved my mom's collection of 4 mix-matched houses that hold our flour and sugar and it's hard to find something I like as much as those, but, thanks to etsy.com I've found some I love. Now that I love some, the problem is that I can't choose, which do y'all like?
I'm crazy about copper, love the warm and cozy antique look and yellow is my FAVORITE color, so I absolutely can not choose.


Thursday, February 10, 2011
Banana Bread with Dark Chocolate

Perfect for a snow day, banana bread is one of my favorite hearty desserts. Today I decided to make it a little bit more dessert-y with some dark chocolate and a brownie pan, rather than the typical loaf pan.
Ingredients:
Wednesday, February 9, 2011
Sliced and Spiced Baked Potatoes
 I adore potatoes, all forms of them, baked, fried, mashed, you name it, I love it! My mom used to make these potatoes when I was little and I always loved them because they look so fancy, but believe me, they're incredibly easy, versatile, yummy and healthy.
Ingredients:
Potatoes (1 for each person you're serving)
Olive oil
Salt
Ground black pepper
Garlic powder
Your choice of herbs--rosemary, thyme and oregano are some of my favorites
Optional Parmesean cheese (whatever kind you have in your pantry)
Directions:
Preheat oven to 375 F.
Slice thin cuts 3/4 of the way through the potato, the thinner the slices the better the potto will cook. Be careful not to slice all the way through, you want the potato to stay together for serving.
Place the potatoes on a baking sheet and drizzle each of them with olive oil. Make sure to get a little oil in between each cut (a basting brush is good for this...or fingers).
Mix together salt, pepper, garlic powder and herbs to taste (truly taste the mixture with each addition so you can get it just right. You will want 1-2 tsp. of mixture per potato.
Sprinkle the mixture on each potato and in between all cuts. Sprinkle parmesean cheese on top of the potatoes if you would like (I wouldn't recommend other kinds of cheese because they will get melty in the oven rather than crispy).
Bake the potatoes in the preheated oven for 35-40 minutes or until all potatoes are cooked through (they should be slightly soft to the touch but not mushy).
Bon Appétit!
Gorgonzola Stuffed Bacon Wrapped Chicken
 Today was my fifth snow day in the past week, so my roommate and I decided that it was a perfect day for some gourmet cooking. In our search to find a recipe that only included the array of ingredients that we had in the kitchen (it's way too cold to go to the store), we decided on a recipe that my roomie has made before...Gorgonzola Stuffed, Bacon Wrapped Chicken! YUM!!
Ingredients (adapted from allrecipes.com)
Feeds 2 people
2 skinless, boneless chicken breast halves (our chicken breasts were sliced)
1/4 cup crumbled Gorgonzola cheese
2 tablespoons minced fresh parsley (we used dried parsley mixed with about a tablespoon of water)
2 tablespoons minced shallot (we used a white onion)
1 clove garlic, minced
4 thick slices of applewood smoked bacon
salt and ground pepper
Directions
Preheat oven to 375 degrees F (190 degrees C). Spray an 8x8-inch baking dish with cooking spray.
Mash together the Gorgonzola cheese, parsley, shallot, and garlic in a small bowl; season with salt and black pepper.
Using a sharp knife, cut a slit into the thick side of each chicken breast about 2 inches long and 1 1/2 inches deep. If your chicken breasts are sliced, you can simply spoon the filling in to the center and roll them up).
Divide the filling in half, and stuff each chicken breast with cheese filling. Wrap 2 slices of bacon around each breast, and secure with wooden toothpicks. Place the chicken breasts into the prepared baking dish.
Bake in the preheated oven until the bacon is browned and the chicken is no longer pink inside, about 35 minutes. An instant-read thermometer inserted into the center of a breast should read about 165 degrees F (75 degrees C).
If you want crispier bacon, you can pan sear the bacon/chicken presents in a little olive oil for a minute or until the bacon is crispy to your liking.
Enjoy!
Subscribe to:
Posts (Atom)
